The purpose of a bicycle gearing system, as with an automobile gearing system, is to keep the engine (which, on a bike, is you) operating within a certain range of RPM (for a car, 2000-5000ish; for a bike, 80-100). Because the RPM range on a bike is much more restricted, bicycles need finer gradations between gears, and because of other engineering considerations, bike gearing is harder to use than car gearing. For this reason and others, many cyclists never learn how to use their gearing system (even those cyclists who buy mountain bikes because they have “27 speeds”). But really, gearing is not that hard to figure out, and since bike components have improved markedly in the past 30 years, shifting is easier now than ever, especially on inexpensive bikes.
First, we need to get some terms out of the way, then I’ll add a bit on how gearing works from a rider’s view, and then a more technical discussion of what goes into a gearing system and how to set up your own (non-geeks can skip the last part).
Definitions
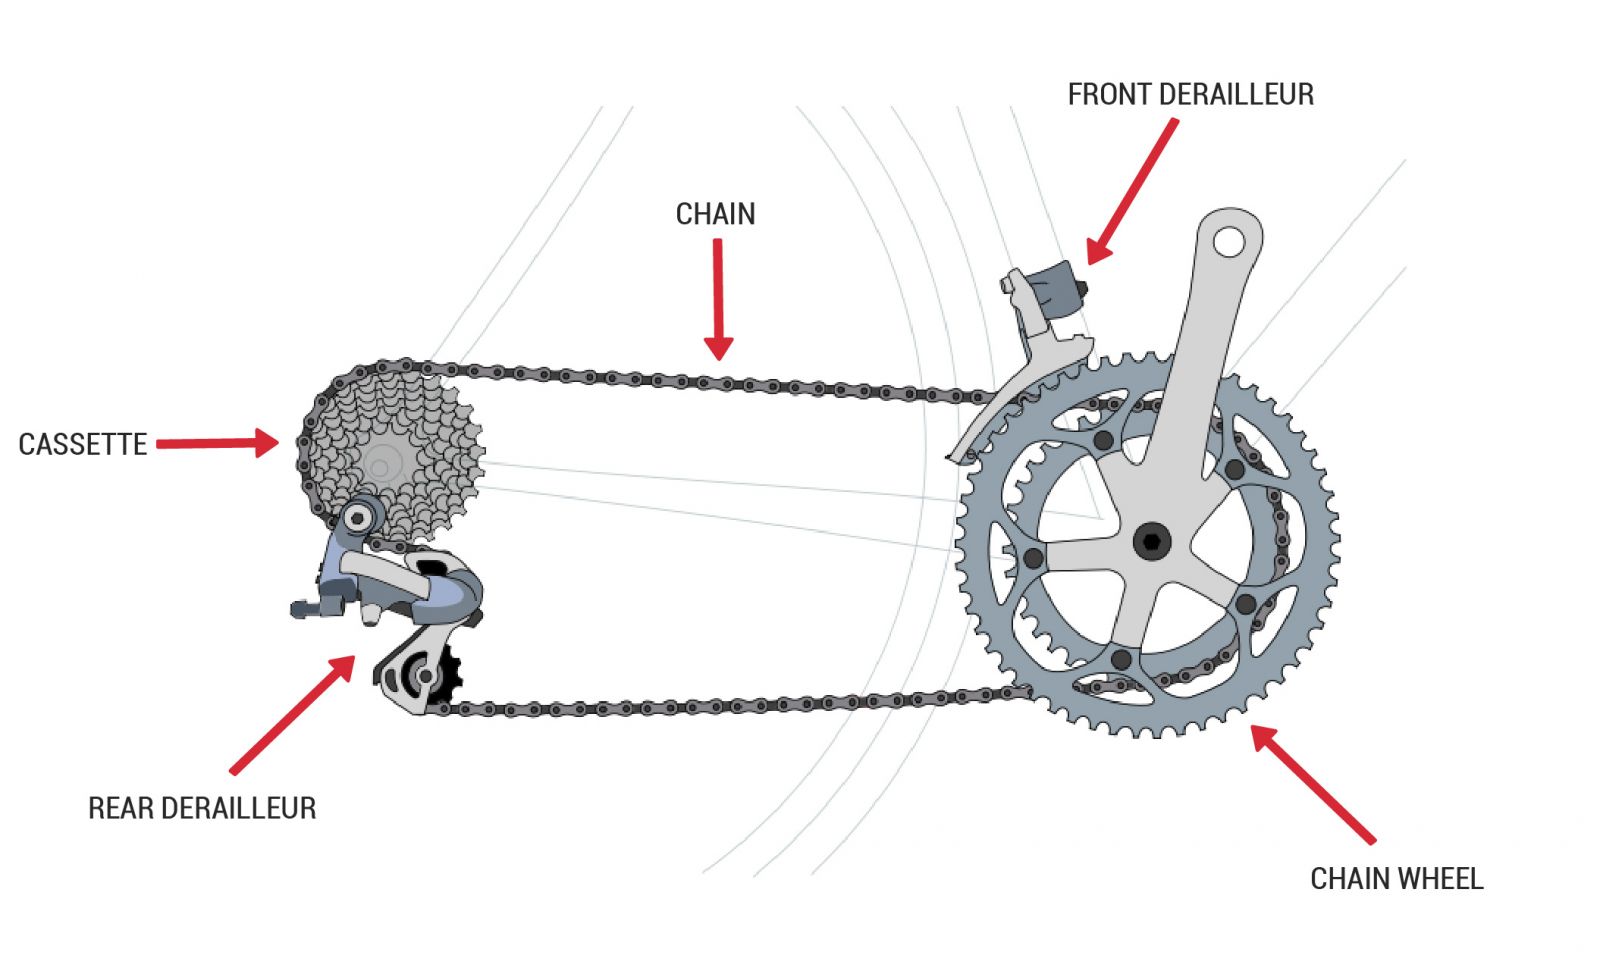
The chain runs on the crankset (also called chain wheel or chainrings) in front and the cassette or freewheel in back (the freewheel is so called because it floats freely on the hub, allowing you to coast or pedal backwards. Early bikes, and hipster fixies, can’t do either). The freewheel is made up of five to 13 cogs (most modern bikes have 9-11; modern mountain and gravel bikes may have 13. Older bikes might have between five and eight). The front derailleur moves the chain between chainrings by pushing on the tense (top) part of the chain. Most new bikes these days have three chainrings; racing bikes and older road bikes have two, and city bikes and fixies have one. The rear derailleur takes up (or lets out) slack in the chain, and moves the chain between freewheel cogs by moving the slack (bottom) part of the chain underneath the desired cog. The shifters are levers that move the derailleurs by pulling on the derailleur cables.
The notation for the current gear involves a character denoting the chainring (if you have more than one) and a number denoting the cog. The small chainring is usually denoted L, the large usually H, the middle, if it exists, M. The largest cog is denoted 1, so L1 is the smallest chainring, largest cog.
OK, now down to basics. What your gearing system does is change the ratio between your pedal revolutions and wheel revolutions. Low gears have a small number of wheel revolutions per pedal revolution (the lowest gears on bikes with 3 chainrings can go below 1:1 ratios). High gears have more wheel revolutions per pedal revolution (the highest gears get up to about 4 wheel revolutions per pedal revolution). The gearing system is able to change this ratio by changing the effective size of the wheel and the cranks (by moving to larger or smaller cogs or chainrings). Smaller chainrings make for lower gears because they reduce the length of chain that is pulled around in a pedal revolution. Larger cogs make for lower gears because they require more chain to be pulled to turn them. So you are in your lowest gear when the chain is on the smallest chainring and the largest cog (inverse for the highest gear). In the notation discussed above, this is “L1.” Many people believe (incorrectly) that their bike has two sets of gears: “low” ones when the chain is on the small chainring, and “high” ones when the chain is on the large chainring. In fact there is considerable overlap between the two, and each bike has a calculable ideal shifting pattern that requires at least one crossover between chainrings (many shifting patterns require more). For details on calculating the shifting pattern of your bike, see below.
However, it’s not really necessary to calculate and remember your shifting pattern to get more out of your gearing system. Just remember three things: One, you need to cross over to the large chainring somewhere in the middle of your freewheel; that is, if you climb a hill in your lowest gear (L1) and want to shift up after the hill ends, you can shift to L2, then L3, then maybe L4, but before you get too far you want to get onto the large chainring by shifting to H2 or possibly H3 (that’s a double-shift to a larger chainring, larger cog). You can actually get by shifting directly across (L3 to H3) but should be careful not to let your cadence drop too much. Two, if you have a triple chainring, your smallest chainring is probably what is called a “granny”; very low gears for big hills. With a granny you use only the biggest 2 or 3 cogs (L1, L2, L3); if you need a higher gear you should get back on the middle chainring. L1 and L2 are usually far lower than M1, L3 is usually pretty close to M1. If you go much above the third cog on the smallest chainring, you can throw your chain. Three, never use the largest chainring, largest cog, or smallest chainring, smallest cog combinations (H1 or L9), for two reasons. First, the steep angle the chain has to take causes excessive wear on the chain, the cogs, and the chainrings. But more importantly, these combinations tax the ability of the rear derailleur to deal with the slack in the chain. The H1 combination can immediately jam the chain if the chain is a link too short, and the L9 combination usually puts more slack into the chain than the derailleur is able to take up; when the chain is too slack, any jolt or bump can knock it off the cogs. Thrown chains (along with flat tires) are the most common cycling problem, often because people insist on riding in the L9 gear. It’s somewhat natural, because in this position both the derailleurs are “relaxed” (no tension on the cable) and the shifters are usually both in the same position. But it’s a bad idea and in any case it’s usually a redundant gear that H5 or H6 can replace easily. That’s about all you really need to know to shift effectively. For the whole story, read on.
The original bicycles are known as “high-wheelers” or “penny-farthings,” the former because the front wheel was huge, the latter because the difference in size between the front and rear wheels was similar to the difference in size between a penny and a farthing. (Of course, they weren’t known that way at the time; they were just called “bicycles.” After the bike design we now recognize as normal was invented, the high-wheelers became known as “ordinaries,” and later as “penny-farthings.”)
On a high-wheeler, the cyclist sat high up on the front wheel and turned cranks mounted directly to the axle. As you might imagine, these bikes were highly dangerous; when the chain-drive bike was invented (fortunately, not too long after the high-wheeler) it was known as the “safety bicycle.”
The front wheel on high-wheelers was huge because a larger wheel travels further with each pedal revolution. By changing wheels, cyclists could shift to a lower or higher “gear.” It was a cumbersome system, but one thing from it remains to this day; gears on “safety bicycles” are measured in “gear-inches.” A gear of 50 gear-inches (usually written as a “50-inch gear”) has the same gear ratio (wheel turns:pedal turns) as a high-wheeler with a front wheel 50 inches in diameter.
The safety bicycle gives another advantage over the penny-farthing here; the maximum gear on a penny-farthing is limited by the length of the cyclist’s legs (since he has to reach the pedals in the middle of the wheel). Top gear on most road bikes is usually 100+ inches.
You can figure out your ideal shifting pattern by computing the gear-inches of each of your gear combinations and putting them in a little chart (see below). Sheldon Brown’s site has a gear calculator that will do it for you; just put in the number of teeth on your chainrings and cogs.
The formula for gear-inches is:

When you think about it, this makes sense. When the number of teeth on the chainring is equal to the number of teeth on the cog, one revolution of the pedals produces one revolution of the wheel; therefore it’s equivalent to the old high-wheelers (except with a smaller wheel). If you change the ratio, you change the effective size of the wheel.
The biggest problem is counting the teeth; some chainrings and cogs have the number of teeth etched into the side, but most you have to count by hand. An experienced eye can make good guesses, though.
For posterity’s sake, here is the gearing on a couple of my bikes.
| L | M | H | |
|---|---|---|---|
| L | M | H | |
| 35 | 49 | 61 | 1 |
| 38 | 54 | 66 | 2 |
| 42 | 59 | 73 | 3 |
| 47 | 66 | 82 | 4 |
| 50 | 70 | 87 | 5 |
| 54 | 75 | 93 | 6 |
| 57 | 80 | 99 | 7 |
| 62 | 87 | 107 | 8 |
| 67 | 94 | 116 | 9 |
This is Giuseppe, my fun weekend bike set up for road riding without much extra weight (though I’ve also toured on it); it has 3 chainrings and 9 freewheel cogs. The optimal shifting pattern is something like L1-L2-L3-M1-M2-M3-M4-M5-M6-M7-H5-H6-H7-H8-H9. The M7-H5 shift is a pain, so usually I will do M5-H5 or M6-H6. This is known as crossover gearing because there’s a lot of overlap between the M and H chainrings, so you only need to cross over once. 35 gear-inches is not a particularly low gear but it usually suits my purposes for this bike. 116 inches is quite a big gear, bigger than I really need, but it’s great for Bear Creek Road and other big descents. This is my recreational bike, after all. Note that L9 and H1 are virtually duplicated.
| L | M | H | |
|---|---|---|---|
| L | M | H | |
| 15 | 21 | 28 | 1 |
| 17 | 24 | 32 | 2 |
| 20 | 28 | 38 | 3 |
| 24 | 33 | 45 | 4 |
| 29 | 41 | 54 | 5 |
| 36 | 49 | 66 | 6 |
| 42 | 58 | 78 | 7 |
| 48 | 67 | 89 | 8 |
| 56 | 78 | 104 | 9 |
This is my wife’s Surly Long Haul Trucker, a pure touring bike set up with 26″ wheels (so, even smaller effective gears). It’s designed to haul heavy loads, and so the gearing is extremely low; in the L1 gear the wheel revolution:pedal revolution ratio is 2:3. The optimal shifting pattern is L1-L2-M1-M2-M3-H2-M4-H3-M5-H4-M6-H5-M7-H6-H7-H8-H9, which is called “half-step plus granny”, a common gearing system on touring bikes. It’s designed to minimize gaps between gears in the huge range that this pattern has. This bike is set up with bar-end shifters, so the double shifts aren’t quite as annoying as they are on other setups, but in practice most of these half steps get skipped, and it’s treated more like cross-over gearing with a pattern like M3-M4-M5-M6-H5-H6.
There are no hard and fast rules for what shifting pattern to use; just remember that the goal is to keep your cadence in the optimal range of 80-100 RPM.
1x drivetrains
Gravel bikes, and increasingly mountain bikes in general, have started to come with drivetrains known as “1x”: instead of having two or three chain rings, they have just one. This simplifies the system, allows you to have just one derailleur and shifter, and reduces weight. The tradeoff is that you lose the multiplier effect of multiple chainrings, so the gearing range isn’t as wide. These systems compensate by having very large ranges on the rear cluster, such as 10-52 teeth, which, in turn, requires a derailleur which can handle that wide a range.
In general, the range of these systems can be nearly as large as a traditional 2x or 3x system, but the gaps between gears can be larger. But, if you’re not using your optimal 2x shifting pattern anyway, it might make more sense to have a big 1x.
Here’s a gearing chart for a 10-52 tooth cassette with a 34-tooth chainring. Compare it to the drivetrains above; it’s actually a bigger range than Giuseppe, but not as big as the Surly touring bike. The gaps at the low end of the range are pretty big but overall it’s a workable setup.
| M | |
|---|---|
| M | |
| 18 | 1 |
| 21 | 2 |
| 25 | 3 |
| 30 | 4 |
| 36 | 5 |
| 43 | 6 |
| 49 | 7 |
| 55 | 8 |
| 62 | 9 |
| 72 | 10 |
| 78 | 11 |
| 85 | 12 |
| 94 | 13 |
Other geared drivetrains
Some bikes (and all geared unicycles) use alternate drivetrains to effect their gearing. Classic “three speed” bikes with Sturmey-Archer hubs, and most of the others in this class, use planetary gearing internal to the hub to change the effective wheel size. This makes the hub axle spin at a different rate than the wheel; to calculate your effective wheel size, you have to combine the axle-to-wheel rotation ratio with the chainring-to-cog rotation ratio. Planetary gearing is less efficient than the more common derailleur system, but because it has more internal parts, it tends to be more reliable, especially in areas which get a lot of rain or snow, and because the chain line never changes, you can use a chain guard. “Amsterdam bikes” and other city bikes use internally-geared hubs.
Fixing a thrown chain without touching it
One of the more common equipment failures is a thrown chain, especially on bikes with three chainrings. In most cases you can fix it without having to touch the chain, which, if you actually ride your bike, is dirty and disgusting. Just use your front derailleur. Shift it as if you’re shifting onto a larger chainring (or a smaller chainring if the chain was thrown off the high side), lift the back wheel off the ground, and gently turn the pedals. If the chain isn’t jammed anywhere, it usually will hop back onto the chainrings.
Ride Bike!